Working with the Image Editor
How to use the Image tool in the Image Manager of the .
- Click the Insert Media
 button and then select Image Manager from the drop down list - OR - Use the CTRL + G keyboard shortcut. This opens the Image Manager.
- Select the required image. See "Inserting Images"
- Click the Image
 button to open the Image .
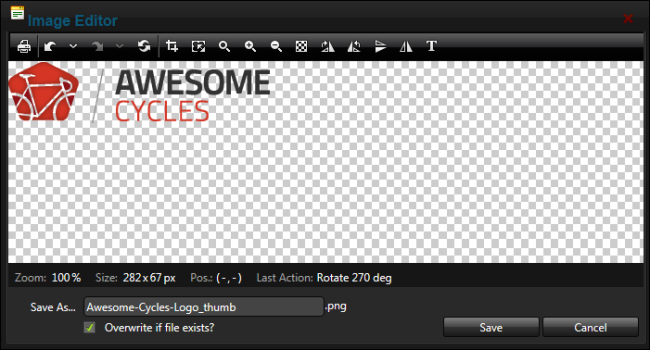
- Select from these editing tool. Once a user makes a selection a dialog will be displayed enabling them to set the properties:
 Print: Select to print the image.
 Opacity: Select and drag the slider to the preferred percentage (%) - OR - Enter the opacity percentage into the % text box.
 Undo: Select to undo the previous step or select a step from the drop down list to unto the selected step and all steps before to it.
 Redo: Select to restore the last step that was undone or select a step from the drop down list to redo the selected step and all steps before to it.
 Crop: Select to crop the image. This will displays a selection box at the top left corner of the image that defines the area to be cropped. Users can change the area to be cropped by dragging and resizing the crop area on the image or by entering the X (vertical) and Y (horizontal) coordinates for the crop area and then entering the pixel Width and Height for the crop area. Unlock the Constrain proportions setting to modify the width and height fields independently or leave it locked to keep the original scale.
 Resize: Select to change the image size using one of these methods:
- Select a Preset Size.
- Unlock the Constrain proportions setting to modify the width height fields independently or leave it locked to keep the original scale. Enter a new pixel value into the Width and/or Height fields or scale the image by entering a percentage into the Percentage text box.
 Zoom: Select to either zoom in or out on the image using the slider, return the image to its original size, or click Best Fit to automatically zoom the image in or out to fit the Image . These selections are not saved on the image.
 Rotate Right by 90 degrees or
  Rotate Left by 90 degrees: Click repeatedly to rotate the image to the right or left.
 Flip Vertically or
  Flip Horizontally: Select to flip the image vertically or horizontally.
- Text: Select to add some text to the image.
- In the Save As... text box, a new name for this edited image is displayed. It is in the format of filename_thumb. Modify this name as desired. Tip: Remove the _thumb from the file name to override the original file. The image will be saved as a .jpg extension file.
- At Overwrite If File Exists? mark
 the check box to overwrite a file that exists with the name entered in the Save As... text box - OR - unmark
  the check box to prevent existing files from being overwritten. This enables a warning message if the file name already exists.
- Click the Save button. Note: If the message "A file with a name same as the target already exists!" is displayed repeat Steps 4 and 5.
Open topic with navigation